


I recently learnt about this topic and wanted to share my insights regarding the same. Now what is SMTP? Basically, A to Z of transfer of any email is handled by it; Simple Mail Transfer Protocol is actually a fundamental component of email communication. It is responsible for transmitting emails over the Internet from one server to another. It handles all the outgoing mail, routing messages to their intended destinations.
Introduction to Mail servers
A mail server is a computer system or software application responsible for sending, receiving, storing, and managing email messages. It acts as a central hub for email communication, facilitating the exchange of messages between users across different domains and networks.
How do EMAILS work?
Sender side: When sending an email, the sender drafts a message using an email client or webmail interface. Upon clicking "send," the email client connects to the sender's outgoing mail server, also known as the SMTP server. The SMTP server verifies the sender's identity and the recipient's domain. It then routes the email to the recipient's mail server using the recipient's domain's MX (Mail Exchange) records.
Receivers Side: On the recipient's end, their mail server, known as the MTA (Mail Transfer Agent), receives the incoming email. The mail server processes the email, conducting necessary checks such as spam filtering and virus scanning, before delivering it to the recipient's mailbox using the Mail Delivery Agent (MDA). Once the email is successfully delivered to the recipient's mailbox, the recipient can access it through their email client or webmail interface.
Various DNS Records
SPF: Used to specify which mail servers are authorized to send emails on behalf of a domain. They help prevent email spoofing and phishing by allowing domain owners to define a list of approved senders in their DNS records.
MX: Indicate the mail servers responsible for receiving email on behalf of a domain. They specify the priority and domain name of each mail server to which incoming emails should be delivered.
A: It map domain names to corresponding IP addresses. They are used to direct traffic to specific servers, such as web servers or mail servers, associated with a domain.
DMARC: They specify how email recipients should handle messages that fail authentication checks (SPF and DKIM) and enable domain owners to receive reports on email authentication activity.
DKIM: DKIM helps prevent email tampering and phishing attacks by confirming that the message originated from an authorized sender associated with the domain.
We have seen that there are multiple email providers on the internet: pramit@gmail.com and pramit@outlook.com; now the transfer of mails between different servers is facilitated using DNS records.

A DNS Query will be sent to pramit@outlook.com to get its MX record, which will define how to handle the emails sent on outlook.com, basically tell you about the mail server address. The A record is then found to send the email to the receiver's address finally. It undergoes various checks for spam and viruses using the SPF records. After successful verification, it's forwarded to the recipient's mailbox using the Mail Delivery Agent (MDA). The recipient can then access the email.
SMTP Commands
HELO/EHLO: The HELO command initiates the SMTP session conversation. The client greets the server and introduces itself. As a rule, HELO is attributed with an argument that specifies the domain name or IP address of the SMTP client.
EHLO is an alternative to HELO for servers that support the SMTP service extensions (ESMTP). If the server does not support ESMTP, it will reply with an error.
MAIL FROM: The MAILFROM command initiates a mail transfer. As an argument, MAIL FROM includes a sender mailbox (reverse-path). For some types of reporting messages like non-delivery notifications, the reverse-path may be void. Optional parameters may also be specified.
RCPT TO: The RCPT TO command specifies the recipient. As an argument, RCPT TO includes a destination mailbox (forward-path). In case of multiple recipients, RCPT TO will be used to specify each recipient separately.
DATA: With the DATA command, the client asks the server for permission to transfer the mail data. The response code 354 grants permission, and the client launches the delivery of the email contents line by line. This includes the date, from header, subject line, to header, attachments, and body text.
QUIT: The QUIT command send the request to terminate the SMTP session. Once the server responses with 221, the client closes the SMTP connection. This command specifies that the receiver MUST send a “221 OK” reply and then closes the transmission channel.

Basically these commands are during the transfer of the email in the SMTP server. The HELO commands allows the start of the session after which the from and to addresses are identified. The DATA command allows the transfer of the content of the mail and OK commands terminates the connection. The default port used is 25.
Steps to create your own mail server
Step 1: Create AWS instance and run mail server on a public ip
I have launched a linux instance to run my mail server, create inbound rules so that the server can be accessed from any IP. We have to install the dependencies (”smtp-server”) and then create our SMTP server with a callback function which allows the function to work seamlessly.
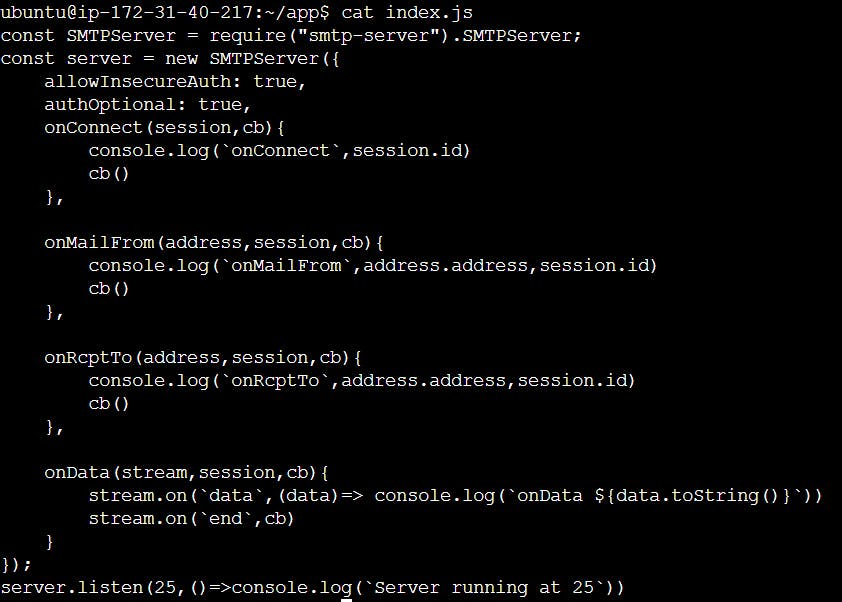
allowInsecureAuth and authOptional are just toggles for going through various checks which we are setting true // you can set your own
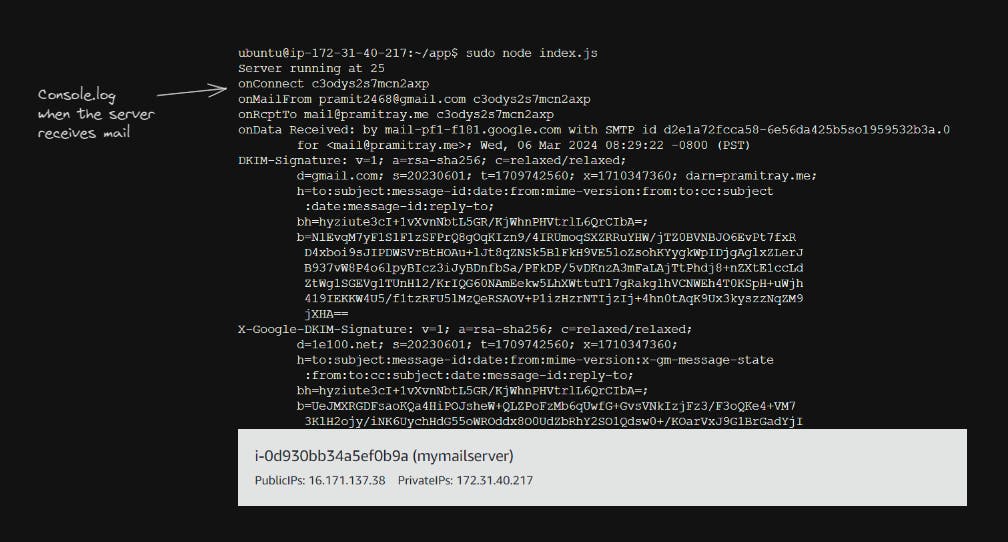
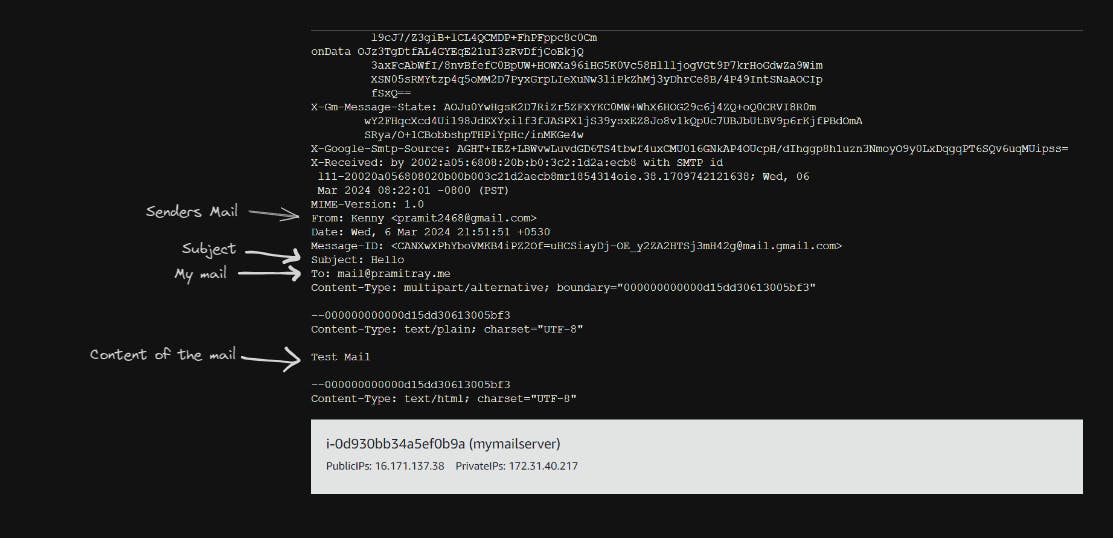
When a SMTP connection is made // an email is sent the console will log the session id along with the the to and send address of the email. The onData will log the whole data including the subject and the content of the mail. The server listen command helps in defining the port for the SMTP server (the default being 25 always)
Step 2: Setup the following DNS records for your site

The pointed DNS records are required to route every mail pointing to the public IP (here being 16.171.137.38) of your AWS instance. All incoming mail will hit the mail server present on the mail server.
Step 3: Send a mail to your new address

As soon as the mail hits the server we will find the following logs in our instance.
Yayyy we have successfully made our mail server using the smtp-server module. We can also change the DNS records to point to another mail address to receive mails there. Exploring the features of DNS records will help us learn new features!
Conclusion
In conclusion, understanding the inner workings of SMTP servers, DNS records like SPF, MX, A, DMARC, and DKIM, as well as the process of sending and receiving emails, sheds light on the intricacies of modern communication.
SMTP servers serve as the backbone of email communication, facilitating the seamless transfer of messages across the vast expanse of the internet. By comprehending the mechanisms behind email sending and receiving, individuals and organizations can better appreciate the complexities involved and take necessary measures to optimize their email systems for efficiency, security, and compliance. Whether setting up their own SMTP server or configuring DNS records to enhance email authentication and delivery, a deeper understanding empowers users to navigate the digital landscape with confidence.
I hope you enjoyed reading my blog! Feel free to connect with me if you share similar interests or have any exciting opportunities to collaborate. Do consider subscribing to my newsletter :)